QML Test Adapter For Visual Studio

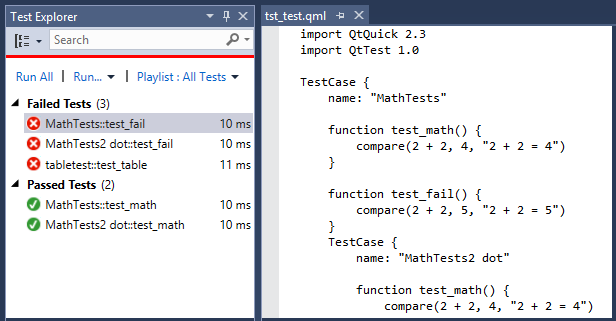
After using the GTest adapter for Visual Studio for a while, I got the idea to make my own for running QML tests. Not that I write particularly many QML tests, but more as an excuse to try to write a Visual Studio extension. It turned out to be straight forward, as there are a few good examples of test runners on GitHub already. I used the Chutzpah Test Adapter as a starting point, and borrowed the solution file interaction from it.

One thing that is maybe not as intuitive as writing plugins for Visual Studio as Qt Creator (for which I wrote the Team Foundation plugin) is the MEF plugin framework. In Qt Creator, you simply inherit the correct interface and put the plugin in the correct folder and Qt Creator will call your functions as you expect. In Visual Studio, the MEF framework magically detects functionality you require from Visual Studio and injects it (for example via Importing Constructors). I had not used MEF before, so this was a bit confusing at first.

The debugging experience is very streamlined in Visual Studio - as soon as you add a VSIX project to the solution, you get a debug configuration that will launch a special “Experimental Instance” of Visual Studio with your plugin already loaded. However, for test adapters you also need to attach to 2 additional processes, the vtest.discoveryengine.x86.exe (or x64) and vtest.executionengine.x86.exe (or x64), as they carry out the actual test discovery and execution.

I have not yet added the project to the Visual Studio gallery, but the source is available on GitHub. Just write me if you have trouble compiling and installing the VSIX file, then I will look into adding it to the Visual Studio gallery.

Comments

Silent PC Build

My previous pc was from 2007, and was getting a bit old, even with upgrades (SSD, new GPU and additional memory). When the first passive NVIDIA GTX 750 Ti arrived, I decided it was time to upgrade. See below for parts list and my comments.

Parts

  • Processor: Intel® Core™ i7-4790K Processor (8M Cache, up to 4.40 GHz)
  • Motherboard: Asus Z97M-PLUS
  • Memory: 2 x Crucial DDR3 BallistiX Tactical 16GB
  • Case:Fractal Design Define Mini MicroATX Tower
  • Graphics: Palit GeForce® GTX 750 Ti KalmX (2048MB GDDR5)
  • Power supply: Seasonic Platinum-520 Fanless
  • Storage: Samsung 840 PRO (250 GB) and Samsung 840 EVO SSD (500 GB)
  • CPU Cooler: Noctua NH-U12S
  • Additional Cooling: 2 1 Scythe GentleTyphoon 120 mm

Comments on the build

  • The 4790K is a huge upgrade over the Intel Q6600 quad core in the previous build.
  • The motherboard is nice looking and works well, but I do not understand why they only included 2 fan headers (in addition to the CPU fan header). I solved the issue with a simple splitter cable (StarTech TX3 Fan Power Splitter Cable), but it appears that this can cause issues when you connect two different fan types to the same header. In addition, I have not yet been able to control the fans through Speedfan, and Asus’ AI Suite 3 cannot control fans based on GPU temperature.
  • The Define Mini case is very nice - it is lower than the previous Antec P182, but not slimmer. I did have a few issues with it; the biggest was that the hard drive mounting was much worse at eliminating vibration than the P182. This may have been me mounting the disk in a wrong way, but in the end, I just gave up, bought an additional SSD and chucked the old spinning disk. The second issue was that I could not fit a long power supply and use the bottom fan slot as well, but there is ample airflow without it.
  • The GPU was the biggest upgrade - not in terms of performance, but noise reduction. Based on benchmarks, the old Asus NVIDIA 560 TI should be a relatively quiet card, but when under load, the fan noise was VERY annoying. The Palit 750 Ti KalmX is as far as I know the fastest fanless card out there right now, and so far, it has handled the games I have thrown at it nicely (Mass Effect 3 and Borderlands 2). The only issue is that the software that comes with the card is quite bad (Palit Thunder Master) - I simply cannot get it to persist an overclock over reboots.
  • The Noctua cooler fits well inside the case and with the motherboard. It handles that heat from the 4790K without issues - when idle I get temperatures around 43 °C at 220 RPM.

Overall, I am very happy with the build and the noise level. The only time I hear it is before the BIOS is loaded and the fans are running at 100% RPM, and even then it is almost inaudible.

Comments

Team Foundation Server Plugin for Qt Creator

Update: Builds for Qt Creator 4.0 and later can be found on the GitHub releases page.

Update: A new build for Qt Creator 3.6 has been added - download.

Update: A new build for Qt Creator 3.5 has been added - download.

Update: A new build for Qt Creator 3.4 has been added - download.

Update: A new build for Qt Creator 3.3 has been added - download.

Update: A new build for Qt Creator 3.2 has been added - download.

Update: A new build for Qt Creator 3.1 has been added.

A few days ago I published my first contribution to an open source project. I chose to make a TFS plugin for Qt Creator, which did not exist, and seemed straight forward to implement, as the command line client for TFS (TF.exe) already implements a lot of the UI needed (check-in dialog, diff, annotate via Team Foundation Power Tools). This has the downside that it does not feel as integrated as other VCS plugins for Qt Creator, but it makes the plugin a lot simpler.

Source can be downloaded at Github and builds for Qt Creator 4.0 and later can be found on the GitHub releases page.

Older binaries are available here for Qt Creator 3.0, Qt Creator 3.1, Qt Creator 3.2, Qt Creator 3.3, Qt Creator 3.4, Qt Creator 3.5 and Qt Creator 3.6.

To install, extract files to a subfolder in Qt Creators plugin directory (example: C:\Qt\Tools\QtCreator\lib\qtcreator\plugins\TeamFoundation). For Qt Creator 3.2, the sub folder structure has been abandoned, and all plugins are stored in the same folder. For Qt 3.5 and later, the initial checkout wizard (icon.png and wizard.json) must be moved to C:\Qt\Tools\QtCreator\share\qtcreator\templates\wizards\projects\vcs\teamfoundation (or where you have installed Qt Creator).

Comments

All-inclusive Q_PROPERTY macro

When declaring properties in Qt, the Q_PROPERTY macro is used to define the property. However, this is only to make the Qt Meta-Object System aware of the property, you still have to manually define at least a getter, and optionally a setter, a member variable and a signal to notify when changed (and possible a reset function). To avoid this, I combined all this functionality in one macro (Gist) (except the reset function, feel free to add this yourself).

#define Q_PROPERTY_FULL(member, _type) \
  Q_PROPERTY(_type member READ member WRITE set##member NOTIFY member##Changed) \
  public: \
    void set##member##(_type _arg_##member) { if (m_##member != _arg_##member) {m_##member = _arg_##member; Q_EMIT member##Changed();  } } \
    _type member##() const { return m_##member; } \
  Q_SIGNALS: \
    void member##Changed(void); \
  private: \
    _type m_##member;

One thing to note is the use of Q_SIGNALS AND Q_EMIT instead of signals and emit, as I had some issues getting the MOC compiler to accept the macro when using the keywords.

Comments

Simple QObject snippets for Visual Studio (2012)

When using Qt with Visual Studio and CMake, I was unable to preserve the functionality of the Qt Visual Studio add-in (for some reason, it demands that the project was created with the add-in), and therefore had to create QObjects by hand instead of using the nifty wizard thingy. As a rudimentary alternative, I created two snippets for a QObject (one for the header, and one for the implementation).

The snippets generate the following code:

Header file snippet

#ifndef INCLUDE_GUARD
#define INCLUDE_GUARD

#include <QObject>

class ClassName : public QObject
{
    Q_OBJECT

    public:
        explicit ClassName(QObject *parent = 0);
        ~ClassName();

    signals:

    public slots:
    
};

#endif // INCLUDE_GUARD

Implementation file snippet

#include "ClassName.h"

ClassName::ClassName(QObject *parent) :
    QObject(parent)
{
}

ClassName::~ClassName()
{
}
Comments
← Newer Page 1 of 2